What is Console?
Console is a project developed by Helium. It provides a web browser front-end for users to manage organizations and devices and a Helium Blockchain-compatible LoRaWAN Network Server (LNS) called Router.
We are working on integrations with third-party LNS's such as Chirpstack, but at this time, this is the only "plug-and-play" solution for operating an OUI. That being said, the Router code is open-source and custom LNS implementations may be derived by anyone already since OUI operation on the Helium Network is entirely permissionless.
Requirements
Before we begin, you should have the following:
- purchased an OUI and noted its number
- installed Docker
- you have some spare HNT to burn ($10-100 worth), for funding your OUI address
- an Auth0 account for user account management
- at least an AWS t2.xlarge (or equivalent), especially if running both Console and its backend (Router) on one server
Optionally, you should also:
- have a fully sync'ed Miner or ETL instance to extract a snapshot from. To learn how to setup a Miner, please read here.
- be able to configure ports on a firewall
Console Setup
Clone the console repo
git clone https://github.com/helium/console.git
Customize Console environment
cp .env-template .env
Then edit .env. Here's an example of what it should look like:
SECRET_KEY_BASE=Rrb2Tz4/HOGtez3X81/5uGsdfxiwwbIesjiQBNkIcwafpXTHJoAPEHQk0Yhw4Nuc
CLOAK_SECRET_KEY=eAqx+rwji6pioOyanpzfxQH8cCS/M3vQjdQ5LeDcSqQ=
GUARDIAN_SECRET_KEY=Rrb2Tz4/FOGtez3X81/5uGsdfxiwwbIesjiQBNkIcwafpXTHJoAPEHQk0Yhw4Nuc
ROUTER_SECRETS=1524243720:Rrb2Tz4/HOGtez4X81/5uGsffxiwwbIesjiQBNkIcwafpXTHJoAPEHQk0Yhw4Nuc
OUI=4
SELF_HOSTED=true
ENV_DOMAIN=localhost:4000
AUTH_0_CLIENT_ID=NyfDZUfyT2thF7G56oazCsdGxO8GRZD6
AUTH_0_DOMAIN=router-dev.us.auth0.com
AUTH0_BASE_URL=https://router-dev.us.auth0.com
DATABASE_DB=console
DATABASE_HOST=postgres
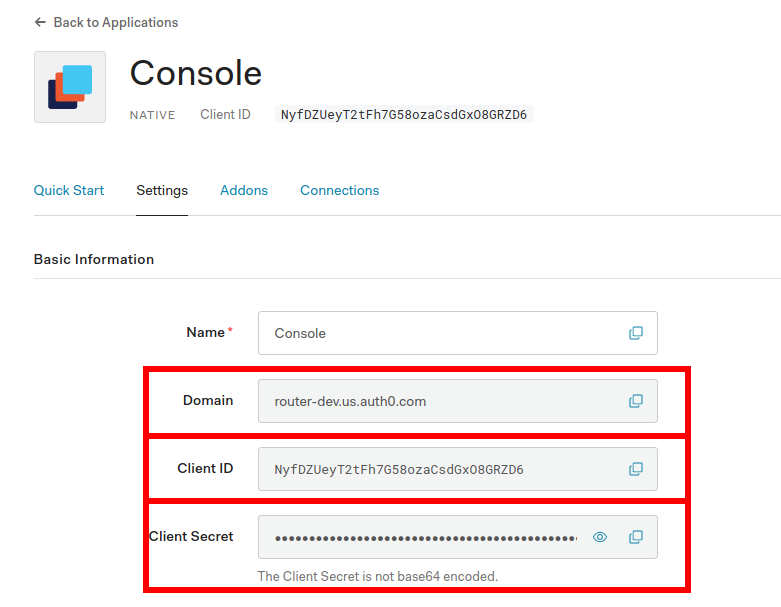
The auth0 fields are taken from your auth0 dashboard where you create an app for Console:

You'll want to extract the appropriate credentials:
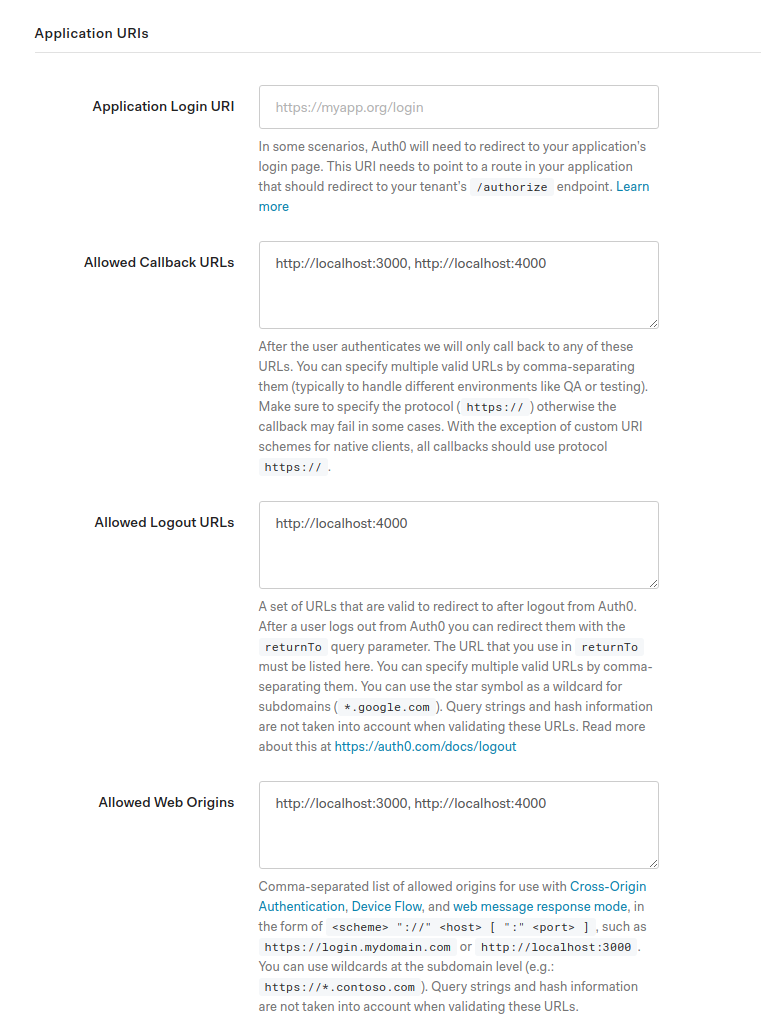
While we are on the Auth0 dashboard, let's add some URIs that we will need for later:
Customize Router environment
We will do something similar for .env-router:
cp .env-router-template .env-router
Then edit .env-router. Here's an example of what it should look like:
# Default Helium's seed nodes
ROUTER_SEED_NODES=/ip4/35.166.211.46/tcp/2154,/ip4/44.236.95.167/tcp/2154

# OUI used by router (https://docs.helium.com/blockchain/packet-purchasing)
ROUTER_OUI=4

# Default devaddr if we fail to allocate one
ROUTER_DEFAULT_DEVADDR=AAQASA==

# State Channel Open amount
ROUTER_SC_OPEN_DC_AMOUNT=2000

# State Channel block expiration
ROUTER_SC_EXPIRATION_INTERVAL=45

# Console's connection info (see https://github.com/helium/console)
ROUTER_CONSOLE_ENDPOINT=http://console:4000
ROUTER_CONSOLE_WS_ENDPOINT=ws://console:4000/socket/router/websocket
ROUTER_CONSOLE_SECRET=1524243720:Rrb2Tz4/HOGtez4X81/5uGsffxiwwbIesjiQBNkIcwafpXTHJoAPEHQk0Yhw4Nuc

# Max time to wait for uplinks in ms
ROUTER_FRAME_TIMEOUT=300

# Turn on/off xor filter worker (anything else than true is off)
ROUTER_XOR_FILTER_WORKER=true
The key point is that ROUTER_CONSOLE_SECRET from this file matches
ROUTER_SECRETS from .env. You can ignore these other fields for now, but we
can revisit them later.
Modify a files before building
In /config/releases.exs, update your host from example.com to localhost.
Run it!
docker-compose up builds Console and launches it with two other containers:
Router and Postgres. You might see helium_router crash a few times as it waits
for helium_console to start up and allow the socket connection between the
two.
If you go to localhost:4000, you should have an auth0 login available to you.
Just as a heads up, all of your important data is in the data in this
console directory.
This is a good time to open up port 2154 for incoming TCP connections. Things
may still work without that but performance will be degraded.
Load a snapshot
Optionally, you can load a snapshot so that your Console is immediately ready for action. Technically, the Router component of Console is what keeps up with the blockchain. You can check its current height
docker exec helium_router router info height
You are likely quite a ways from the tip of the blockchain, but you can load a snapshot from an active miner (or ETL instance or blockchain-node). Details about how to do this are here.
Simply replace miner with docker exec helium_router router for most of the
commands to work.
OUI Update
At this point, we have the software running and we have an OUI, but the blockchain does not know that the address of Router is associated with the OUI. Let's get the address of the OUI
$ docker exec helium_router router peer addr
/p2p/11xHXS5AgLyjYRCJ4ctcWcsMRULS8jro9Pb1GPaTG1neGk1dNcf
The string after the second slash,
11xHXS5AgLyjYRCJ4ctcWcsMRULS8jro9Pb1GPaTG1neGk1dNcf, is the libp2p address and
this is what you need to update your OUI with, using the wallet you bought the
OUI with.
$ helium-wallet oui update routers --oui 4 --nonce 1 --address 11xHXS5AgLyjYRCJ4ctcWcsMRULS8jro9Pb1GPaTG1neGk1dNcf --commit
Once this transaction clears, the network will know about the association. It may take a few minutes, but once the transaction clears, your OUI will be able to open and close state channels and update your device table on the blockchain.
Monitor the account in explorer to verify that Router is doing this
appropriately. eg:
https://explorer.helium.com/accounts/11xHXS5AgLyjYRCJ4ctcWcsMRULS8jro9Pb1GPaTG1neGk1dNcf
Test a Device
Login to your local Console instance (localhost:4000) and create an organization and a device. If you ever need help with Console as a user, much documentation exists here.
Once you've created the device on console, go to a terminal window on server
running Console and execute the following command to tell Router to update the
xor filter on the blockchain:
docker exec helium_router router device xor --commit
Give the transaction some time to process (you can track it on explorer). Once it has been processed, you can try joining the device. If you see a successful Join Request, then you are successfully running your private LoRaWAN Network Server.
Congratulations!